« 1 » « 2 » « 3 » « 4 » « 5 » « 6 » « 7 »
< 4-1 > • 1 • 2 • 3 • 4 • 5 • 6
< 4-2 >
< 4-3 >
< 4-4 >


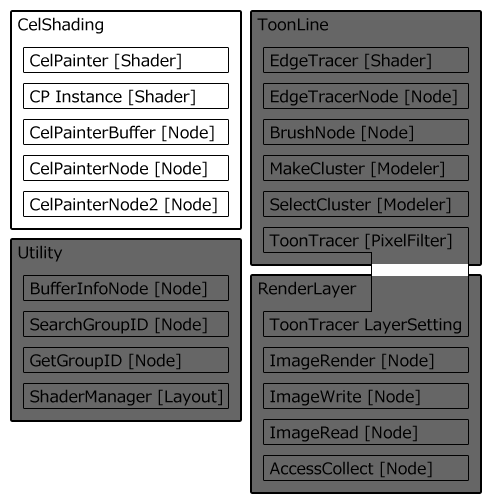
4-1. CelShading Plugin


1. Overview


There are "painting" and "line" in toon rendering.
A cel shading plug-in takes charge of "painting."
Although the name with the image of the single color painting a "cel" is used as a general name, a watercolor painting and a sketch expression are also possible by setting of a parameter.
Fundamentally, receive one surface
  • CelPainter [Shader]
  • CelPainterNode [Node]
  • CelPainterNode2 [Node]

  • It is used from this inside, setting one.

  • CP Instance [Shader]

  • CelPainterBuffer [Node]

  • These are used as auxiliary plugin.


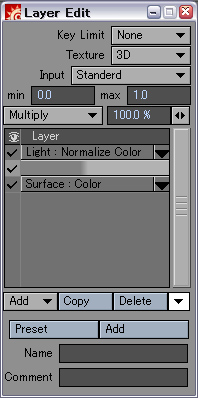
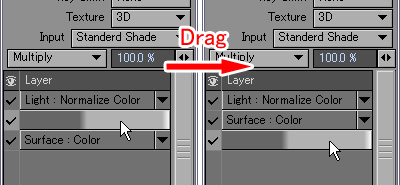
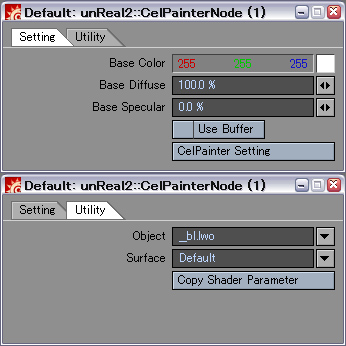
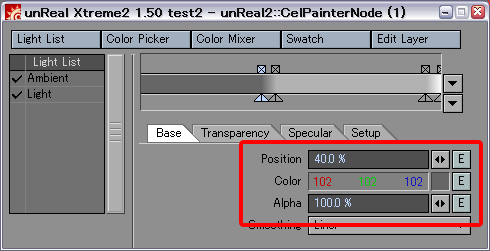
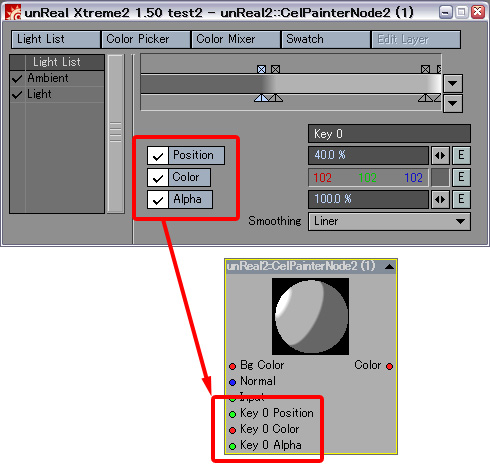
    2.CelPainter shader

    Main panel
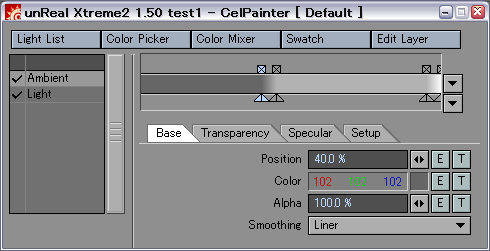
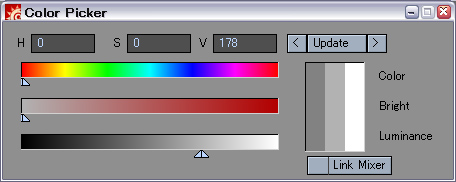
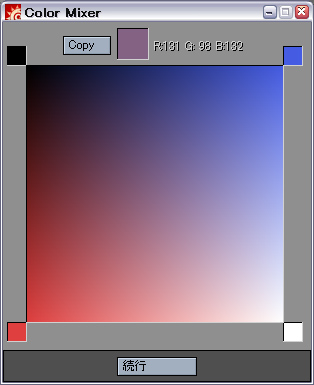
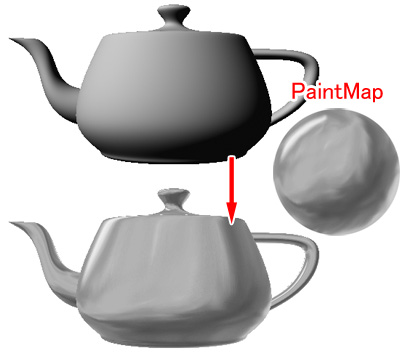

    • Sub panel display button
    • The various sub panels for performing more advanced cel shading setting are opened.

      • Light List
      • A light list edit panel is opened and closed.
        Details here

      • Color Picker
      • The custom Color Picker panel of CelPainter is opened and closed.
        Details here

      • Color Mixer
      • A color mixer panel is opened and closed.
        Details here

      • Swatch
      • A swatch panel is opened and closed.
        Details here

      • Edit Layer
      • A layer edit panel is opened and closed.
        Details here

    • Light List
    • The status of the selective light set up by the light list edit panel is displayed.
      What the check attaches beside the light name is the light which is effective.
      Only the description of the selective light set up by CelPainter is displayed as this list, and an exclusion of the light in the object unit of measure by the side of Lightwave, a diffusion of a light property, and reflective no effect setting are not influenced.
      However, shading also including selective light setting by the side of these Lightwave(s) is done to an actual rendering runtime.

    • Gradient

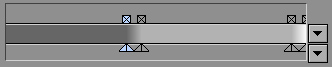
    • In this area, the display of gradient and the edit of a key position which are edited can be performed.
      It can be operated like standard gradient texture setting for Lightwave.
      The status of a layer that the parameter (base, speculer, transparency) chosen with the edit tab is chosen is displayed on the preview area of gradient.

      • Main display
      • Although the gradient of the parameter edited now is displayed on the middle row, when two or more layers are blended, a display can be changed in order to turn an edit easy to do.
        "Full": Blend and display all the gradient layers.
        "Layer Only": It is displayed in the status excluding the surface of the base from "Full"
        "Select Layer Only": Display only one layer chosen now.

      • Key area
      • The key of the selection layer is displayed on the bottom row, and an edit of the position of a key can be performed by dragging the handle of a key.
        Moreover, the key list in a layer can display and choose from a popup.

      • Gradient Key
      • The key of gradient can be chosen by clicking a triangular handle, and can be moved by a mouse drag.
        However, when the envelope is assigned as the key position, the square handle of a key upper portion can serve as the "E" notation, and it cannot be made to move.
        Moreover, a color context menu can be used by right-clicking a handle.

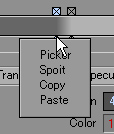
        Details here
        A key can be deleted by clicking the square handle of a key upper portion.
        Any positions of the preview area middle are clicked to add a key.


      • Keyboard shortcut
      • The following key operations are supported in the CelPainter main panel.
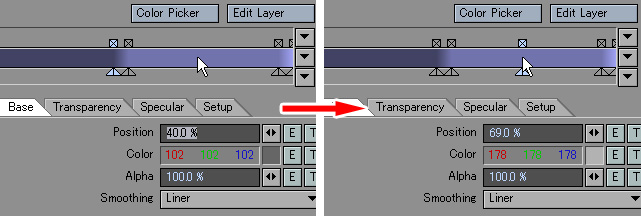
        "Left, Right key" : A modification of a select key
        "p" : The color of a select key is changed by Color Picker.
        "s" : The color of a select key is changed by Spoit tool.
        "c" : The color of a select key is copied to a clip-board.
        "v" : It pastes on the color of a select key from a clip-board.

    • Key parameter edit

    • This area does a display of a parameter with a detailed key chosen in the key area, and an edit.
      • Position
      • Usually, although it is 0% to 100% of span, it becomes -100% to 100% of a span at the time of a negative shade using.
        The boundary of a color becomes fuzzy and atmosphere like hand painting can be taken out with applying a texture to a position.

      • Color / Transparency
      • The color of a key position is set up.
        It becomes a specification of transparency when transparency is chosen with the parameter tab.
        When a texture is applied to a color, a texture becomes effective only in the span of the key.

      • Alpha
      • The alpha blending of a key is set up.
        By performing it to less than 100%, a lower layer is transparent and it comes to be visible.

      • Smoothing
      • The interpolation mode of the colour to the next key is chosen.
        "Linear": It is interpolated so that a color may be connected smoothly.
        "Step": The color of the current key continues to the key position of the following.

    • Setup Tab
    • A "Setup" tab is a special tab which does display setting of a plug-in.

      • Shader Output
      • It enabled it to choose the output mode of the shading result calculated by CelPainter from three kinds.

        "Classic (LW6.x)" is surface parameter set
        color = CelDiffuseShading + CelSpecularShading
        specular = 0%
        diffuse = 0%
        luminous = 100%

        "Replacement Color (LW7.x)" is
        replacement_color = CelDiffuseShade + CelSpecularShade
        replacement_percentage = 100%

        "Standerd (LW8.x)" is
        diffuse_shade = CelDiffuseShade
        specular_shade = CelSpecularShade

        Usually, it is satisfactory with Standerd.
        Probably, it is good to employ efficiently the know-how used combining other shader by CelPainter of a previous version to select Classic.
        Moreover, this setting is disregarded by CelPainterNode.

      • Transparent BG 1 , 2
      • This color is customizable, although a check pattern is transparent and the translucency section of a layer is visible.


    Color context menu


    A color context menu is a right-click menu currently used within CelPainter, in order to perform setting of a color, and a copy efficiently.
    Refer to the instruction of each panel for the part which can be used.
    • Picker
    • Standard Color Picker is opened and a color is selected.

    • Spoit

    • A spoit panel can be opened and a color can be got from other applications on a desktop simulation etc.
      spoit panel can cancel an acquisition of a color by right-click.

    • Copy
    • The color for a selection is copied to the clip-board of Windows.

    • Paste
    • The color currently kept to the clip-board is got and set up by Copy.


    Light List Edit Panel


    By this panel, an effective selective light can be set up within CelPainter.
    Setting is a selection directly only an ambient light and the matching with a name and a filtering string does the other light.

    • Ambient
    • This checkbox changes the enable of an ambient light, and an disable.

    • Filter List
    • The list of the current filter setting is displayed.
      When one does not have filter setting, all the lights become enable.
      When there are two or more filters, it is applied in an order from a top.
      It is possible to replace order by dragging a list item.
      Moreover, a filter can be temporarily repealed with the check beside a filter setups.

    • Filter parameter area
    • Each setting of a light filter is inputted and edited in this area.

      • Matching string
      • The string which wants to filter a matching string light name is inputted.
        The light list in the current scene can be chosen from a right popup button.
        Moreover, when "*" and "?" is used by a matching string, it has a special function.
        As for "?", any one character corresponds, and, as for "*", two or more characters of any correspond.

      • Matching type
      • It is chosen whether it filters to the light which did not match whether it would filter to the light which matched the matching string.

      • Filter type
      • It is chosen whether it is excluded whether the light used as the target for filtering is included.

      • Add
      • The filter parameter inputted is added to a list.

      • Update
      • It updates by setting which has inputted the parameter chosen by a filter list.

      • Delete
      • The parameter chosen by a filter list is deleted.


    Color Picker Panel


    It can set up by the Color Picker panel, comparing the color of gradient each key with the color and luminance of neighboring keys.

    • Color area(Color , Bright , Luminance)
    • Focusing on the color of the key chosen now, the color of the key of the neighbors is displayed on right and left.
      The area is divided into three layer, a upper row displays a color, the middle displays the brightness of the color, and the lower berth shows the luminance.
      Although a color is darkish toward black in general shading in a dark section, a good result will be brought, if a color is chosen to set up the bright shade of an anime tone so that a brightness may fall adjusting a hue mainly and keeping up a luminance.

    • <A>button
    • A select key is changed.
      When a color is under creation, keep in mind that the color will be overwritten by the colour area if a key is chosen.

    • Update
    • It is set as the color of the key which is having the color of a colour area chosen.

    • Color slider
    • A color is set up in a HSV format.
      It is also possible to drag a triangular handle directly and to set it up in addition to a slider.

    • Link Mixer
    • If this check is enabled, the color selected by the color mixer panel will be influenced in a real-time by the setups color of this panel.


    Color mixer panel


    By a color mixer panel, gradation can be created from four arbitrary colors and a color can be selected from the inside.

    • Blend color
    • The color used for gradation by the color box arranged in four corners is specified.
      A color context menu is opened by right-click, and a selection of a color can be performed.

    • Gradation area
    • The gradation generated from the blend color is displayed.
      The color of the position is displayed to an acquisition and a selection color box as a left-click.

    • Selection color box
    • The color specified in the gradation area is displayed.
      A color can be copied to a clip-board with the Copy button, and it can paste by Paste of other color contexts.


    Swatch panel


    The created color can be registered and managed by a color sample panel.
    Moreover, an input/output of Swatch (extension .aco) of Photoshop is also possible for a color sample file.

    • Palette
    • The list view of the registered color is performed.
      A color is selected by left-click.
      The name of the selected color is displayed on the text area of the palette lower part.
      A modification of a color and a copy can be done by right-click using a color context menu.

    • Add
    • A new color is inserted in a cursor position.
      Since black is inserted, please change into arbitrary colors by a color context menu.

    • Delete
    • The color of a cursor position is deleted.

    • Export
    • The current color sample palette is saved at a file.
      The extension of a file is .aco and this has the Swatch file and compatibility of Photoshop. Reading as it is by Photoshop is also possible.
      Moreover, at the time of the close of Lightwave, setting of the color sample palette in the time is saved as unreal2.aco at a folder with a Lightwave config files, and is automatically read into a start next time.

    • Import
    • A color sample file can be load.
      Although the Swatch file created by Photoshop can also be read, the color mode supported is only a thing of RGB and HSB, and when the other CYMK, Lab, etc. read, they are displayed on a color sample palette as x.
      However, since it keeps, a data original inside can be correctly read, when saving as it is and it reads by Photoshop again.


    Layer Edit Panel

    In CelPainter, gradient, a surface color, and a light color can be handled as a layer, and, as it were, it can compose like 2D paint software.
    Setting of each layer, the order of a layer, etc. can be edited by a layer edit panel.
    • Layer
    • The current layer list is displayed by a thumbnail.
      A layer is stacked up sequentially from the bottom like the texture of Lightwave, and a final color is decided.
      A list item is dragged directly to replace the order of a layer.

      The check at the left end of a layer list is turned OFF to repeal without deleting a layer.
      Moreover, special layers other than gradient can choose type from a right end pop-up button.

      • Add
      • A new layer is added to a list.
        "Gradient" adds the gradient which does standard cel shading.
        "Surface" is a layer which refers to the data on the surface parameter by the side of Lightwave, and there are the following types.

        [Color]
        The color of the surface in the time of a processing of CelPainter being done is got.
        This color also has a case of the color after it was the color of the surface parameter itself or other shader and a node changed.

        [Raw Color]
        Unlike [Color], color setting of a surface parameter is got purely.

        "Light" is a layer which refers to light-related data, and there are the following types.

        [Color]
        The usual light color is got.

        [Normalize Color]
        The light color processed into cel shading is got.

        LayerBuffer is a color buffer which CelPainter has in an inside, and can be used to eight.
        Setting of the value to a buffer connects other nodes direct as Input by CelPainterNode, using CelPainterBufferNode.

      • Copy
      • The chosen layer is duplicated.

      • Delete
      • The chosen layer is deleted.

    • Layer parameter area
    • In this area, the layer itself chosen by a layer list is set up.

      • Key Limit
      • When an envelope and a texture are set as the key position of a gradient layer, depending on a result, the key may cross the position of the next key.
        The spatial relationship of the key in that case can be limitation.
        "None" does not limit, but even if the position of a key interchanges, it is processed as it is.
        "Lower" receives a limitation so that the position of the key in a left side may not be exceeded.
        "Upper" receives a limitation so that the position of the key in a right side may not be exceeded.

      • Texture
      • The coordinate system of the texture applied to the key of the gradient layer is set up.
        "2D" pastes a texture on a planar.
        "3D" becomes the same operation as the texture of the standard of Lightwave.
        "PaintMap" is a special mode in which a texture coordinate is calculated from normal, and the image of the hand-drawn style can be easily created by using the texture describing the shading image of the ball.


      • Input
      • The input source of gradient is set up.
        "Standerd" considers a diffusion shading value as an input like general cel shader.
        Input Buffer can be used to eight by the layer buffer and the buffer which CelPainter has in an inside similarly.
        Setting of the value to a buffer connects other nodes direct as Input by CelPainterNode, using CelPainterBufferNode.

      • min , max
      • The display rectangle of gradient is set up.

      • Layer blend
      • The operation mode of overlapping by a lower layer and transparency can be set up.

    • Preset area
    • The created gradient layer can be registered into preset shelf in this area.

      • Preset area opening and closing
      • A preset setups area is opened and closed with the button of Triangle.

      • Preset
      • The preset shelf for gradient is opened.

      • Name
      • The name of the gradient to register can be inputted.

      • Comment
      • The comment of the gradient to register can be inputted.

      • Add
      • The gradient layer chosen by a layer list is added to a preset shelf by the name and comment into which it is inputted.

        Conversely, the gradient thumbnail of a preset shelf is double-clicked in the status that the layer list to take in is displayed to take in the layer of preset shelf.


    3.CP Instance Shader

    Main panel


    CP Instance shader is a plug-in which works as an instance of CelPainter set as other surfaces in a scene.
    Since the modification will be influenced also in CP Instance if CelPainter setting of a reference place is edited, it is effective to apply the same CelPainter setting as a lot of surfaces.
    • Object
    • The object of a reference place is specified by a filename.
      The object in the current scene can also be chosen from a popup.

    • Surface
    • A reference surface name is specified.
      The list of the surfaces contained in a reference object can be displayed and chosen from a popup.


    4.CelPainterBufferNode

    Node


    Main panel


    CelPainterBufferNode is InputBuffer which can be used by CelPainter shader, and a node which sets up the value of a layer buffer.

    Input
    • Input 0 - 7 (NodeInput)
    • The value of InputBuffer is specified.

    • Layer 0 - 7 (NodeInput)
    • The value of a layer buffer is specified.

    Output
    • Access
    • It is a dummy value for operating a node.
      The node by which the node of Lightwave is not connected to the root node for increase in efficiency will be disregarded.
      In order to avoid it, please connect with the topic which sets up an arbitrary value by a panel and a Surface node does not use.


    5.CelPainterNode

    Node


    Main panel


    CelPainterNode is what node CelPainter shader, and, in addition to the completely same operation as shader, also supports the rendering by FPrime of Worley Laboratories manufacture.


    Input
    • Setting tab

      • Base Color(NodeInput/Panel)
      • It is a color of a ground.
        It corresponds to the surface color in shader.

      • Base Diffuse(NodeInput/Panel)
      • Diffuse value.
        It corresponds to the surface parameter in shader.

      • Base Specular(NodeInput/Panel)
      • Specular value.
        It corresponds to the surface parameter in shader.

      • Normal(NodeInput)
      • Normal vector.

      • Use Buffer(Panel)
      • It checks, when using InputBuffer and a layer buffer.
        A check will display Input of each buffer on a node input.

      • CelPainter Setting(Panel)
      • The setups panel of CelPainter opens.
        The description of the panel is the same as a shader version. However, the texture to a key parameter cannot be used.


      • Input 0 - 7 (NodeInput)
      • The value of InputBuffer is specified.
      • Layer 0 - 7 (NodeInput)
      • The value of a layer buffer is specified.
    • Utility tab
    • There is a function for shifting a data from CelPainter shader.

      • Object(Panel)
      • Surface(Panel)
      • The object in a scene and a surface are selected.
        When CelPainter shader is set to the selected surface, a Copy Shader Parameter button becomes effective.

      • Copy Shader Parameter
      • CelPainter shader setting of the selected surface is taken in.


      Output
      • Material
      • It is an output of shading.


    6.CelPainterNode2

    Node


    Main panel


    CelPainterNode2 is the node which performed CelPainterNode simple and only one layer has cel gradient.
    However, it is possible to perform a key parameter a node input, and a complicated expression is enabled by combining with other nodes.

    Input
    • Bg Color(NodeInput/Panel)
    • It is a Back ground color.

    • Normal(NodeInput)
    • It is a Surface Normal.

    • Input(NodeInput)
    • It is an input value to cel gradient.

    • CelPainter Setting(Panel)
    • The setups panel of CelPainter opens.
      The description of the panel is the same as a shader version. However, a layer edit cannot be used.


    Output
    • Color
    • It is a output color.

    CelPainter edit panel


    • Position
    • Color
    • Alpha
    • If a checkbox is enabled, a value can be acquired from a node input.


    ∧ Top ∧